How to Run Assessments
Creating a new Assessment is performed by using a step-by-step process that is frame-worked throughout the Run Assessment page. Here are some specifics on how each of the steps work.
1
Choose Assessment
|
- The available menu is based on the user type, customer, and payment plan
|
|
2
Choose Athlete
|
- Search and select individual to perform the assessment on.
- If the individual is missing from the listing, change your group in the top menu or create a new one.
OPTIONAL:

- Copy the Patient ID to be used in the Patient Info on your UltraSound device
|
|
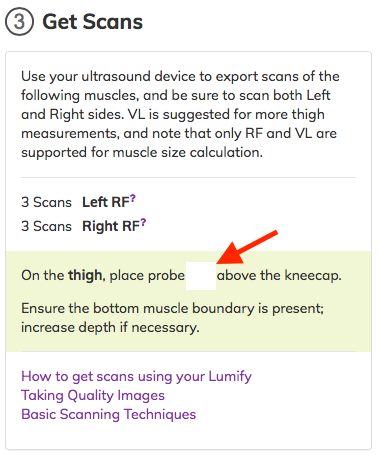
3
Get Scans
|
- These are the instructions of the scans to collect for the selected assessment.
- The instructions will reference what is required for the given assessment as well as suggestions based on previous assessments for the selected individual.
- Fuel assessments always require/suggest scans from the thigh (RF), as this muscle provides the most accurate snapshot of overall fuel status.
- 3 Fuel scans of each muscle are suggested for a more accurate result (and you will be able to delete bad images and still meet the minimum required muscle scans).
- Scans of each muscle side are suggested for all muscle groups of interest. MuscleSound will be able to provide 4x the amount of actionable results if both sides are scanned.
|
|
4
Choose Study
|
- This section is a live polling of the scans you have exported to MuscleSound. Ultrasound devices group scans together into Studies. The Studies will be listed here.
- If the study does not have a matching patient id it will be tagged 'anonymous'.
- If the study currently meets all of the requirements of the Assessment type it will have a green checkmark
- Studies can be joined together if they are from the same ultrasound model and within an hour apart.
- If your study is missing, it has not successfully exported off of the ultrasound device, or the device is not associated with your organization appropriately.
|
|
5
Review Scans
|
- The scans are grouped by their current assignment.
- The review listing will indicate the status of the groupings.
- Alerts, and suggestions will populate accordingly.
- Delete any bad scans. There should be obvious visual evidence.
- If required scans are missing, Collect more scans from your ultrasound device and add them from the listing in Step 4. OR you can change the assessment type to with fewer requirements.
|
|
6
Complete Assessment
|
- Populate the form with the appropriate information.
- The 'Complete Assessment' button will finalize the assessment.
|


